User Guide
- General Information
- General Data Entry
- Adding a New Case / Case Information Screen
- Letters
- Calendars and Reports
- Money
- Miscellaneous
- Cases
- Add a Case
- Add a VTL, PL and Non-Civil case
- Add a Small Claims, Civil or Civil Proceeding
- Downloading e-Tickets
- Case Search
- Case Information Screen
- Modify Case
- Plea By Mail
- Fine Fee Payment
- Enter Disposition Information
- Seal Charges
- Bail Options
- Miscellaneous Money Transactions
- Parking Payments
- REPORTS
- Audit and Control (AC1030)
- Calendars
- Financial Reports
- Miscellaneous Reports
- Non Case Related Letters
- UTILITY
- HELP
General Data Entry
- No need to press shift when entering data, the computer automati y caps the first letter of each word.
- .12345 (zip code) in city field will automatically enter city, state, zip.
- .123 (badge number) in officer field will automatically enter officer once they are in officer list.
- After entering a date in a date field use the '+' and '-'keys to move the date forward or backward a day at a time.
- Touch the plus key '+' on the number pad of the keyboard to enter the current date in a date field.
- Touch the F4 key on the top of your keyboard to enter the current date in the notes field. Return to index
Adding a New Case/Case Information Screen
- When adding a speeding case, enter the speed in the Description field following the word Speeding or Speed. The format should be 75/55 (actual speed/speed limit). If applicable, enter the BAC in the Description field.
- When manually entering a VTL case with multiple charges, be sure to enter the ticket number for each charge. Often, the first seven digits are the same, so only the last 2 digits need to be entered.
- Print downloaded tickets on pink paper to differentiate them from other pieces of paper on your desk. Remember the old TSLED tickets that came on pink paper? You may find other uses for colored paper to make documents easier to identify.
- When viewing a defendant's information screen press 'C' on the keyboard to access the list of checkbook records for that case. They are available for viewing and editing.
- Place the mouse anywhere on the Case Information screen and right click for more options, such as Print Case History.
- The case number is built in the following manner: 09010001.01 where 09 is the year, 01 is the month 0001 is the first case of the month and .01 is the charge number. So, if a five charge case is the 104th case to be entered in of April 2009, then case number would be 09040104.01, 09040104.02, 09040104.03, 09040104.04 and 09040104.05. This satisfies the requirement of every charge having a unique docket number.
- For non-civil cases, select either option 1 or 2 from the Add a Case screen. On the Charges screen, be sure to back up to the Statute field and enter the proper statute.
- In order for the scoff lift fee to show on the fine notice and be included on the Case Information screen in the Amount Due, the action code must include the word 'Scofflawed'.
- There are 5 types of Seals. On the Seal Suppress screen hold the mouse over the seal type field to get the proper seal types: 0 for 160.50, 5 for 160.55, Y for Youthful Offender, F for Family Court Removal, 8 for Drug Court Seal or E for Apparently Eligible Youth.
- All tasks related directly to one case can be done from the defendant's information screen. Click on Modify Case to see all the choices.
- When a defendant has multiple cases with the same crime date they may be merged together into one case. Click on Modify Case -> Case Modification -> Merge in another case. This option is used to combine charges from the same incident but downloaded into the program on different days as separate cases.
- When a defendant has other open charges pending in the court, a button labeled More Charges displays above the defendant's name on the Case Information screen. Moving the mouse over the new button displays the number of open charges. A left click of the mouse opens the Case Search screen to display all open charges.
- Often a defendant has two different residences (college, home). On the Case Information screen, click Name/Address to change the address. You'll have the option to save the old address as an alias. When you make a correction to an existing address, you do not need to keep the original address as an alias. It is recommended you save all addresses for a defendant.
- Quickly identify which judge 'owns' a case by setting the Case Information screen background to a unique color for each judge. Click on Utility -> Edit Databases-> Judges. Click on the Set BG Color button and select a color, Save/Exit. Do this for each judge, being sure to select different colors.
- Barcodes can be printed on letters, tickets and calendars. Scanning the barcodes makes screen access quick and easy. Return to index
Letters
- Letters are designed to fit into window envelopes.
- When selecting a letter to print, add the letter E to the end of any letter # (i.e. 8E) to edit the body of the letter for that defendant's letter only. All letters can be changed to fit your needs, call for assistance.
- Letters can be archived providing the ability to access a copy of the original letter with the original date. Call the office if you do not see Archive a Copy on the Send Letter Screen, we can help initiate the feature.
- You also have the option to create your own letters. Click here to view or print the letters manual. Return to index
Calendars and Reports
- Create calendars for any action code or multiple action codes, i.e. a list of defendants with warrants or a list of scofflawed defendants. Select Reports-> Calendars and select the style of calendar you want. Enter Today's Date and set Exact Date Match to N. Enter the action code(s) you wish to search on.
- When viewing a calendar go directly to the Case Information screen by clicking on the defendant's name OR you can go directly to the Case Disposition screen by clicking on the charge information OR go directly to the Adjourn screen by clicking on the action area. The arrow changes into a hand to go to these tasks. If the mouse does not change from an arrow to a hand when moving around the calendar, give us a call and we'll help you pick a different calendar format.
- When viewing the Audit and Control report go directly to a Case Information screen by clicking on the name of the defendant in the report. Return to index
Exact Date match = No searches for all cases prior to the date you entered.
To get a list of ACD's, enter a future date to make sure you get a complete list.
Money
- State fees such as the scoff lift fee are entered on the State Fees screen which can be accessed from the Fine/Fee Payment screen, the Plea by Mail screen or the Modify Case list.
- The deposit date controls the financial reports (deposit slip, cashbook report); report date is the Audit and Control report date.
- Bail poundage is reported as a checkbook record in the original case in civil fee. View the bail poundage checkbook record by pressing 'C' from the Case Information screen. Return to index
Miscellaneous
- Prompts at the bottom of the CDR screen give hints for each field.
- Seal the case at the information screen before doing the CDR so the seal type appears on the CDR.
- Backup your data at end of work for the day onto a flash drive, floppy disk or CD. We recommend multiple disks or jump drives to be used on alternate days. Periodically, send a backup by clicking on Help -> Upload your backup to SEi. Select Show Progress to create a new backup or Run in Background to send the last backup you created.
- Get a program update monthly by clicking on Help -> Get latest Program Update. After updating, select Help -> Recent Changes to read about the modifications made in the new version. If your court is networked each machine should get the update when the CourtRoom Program is opened the first time. IF A MACHINE DOES NOT GET AN UPDATE, CALL FOR ASSISTANCE.
- We hold several user group meetings each year. Check our website www.nycourts.us for the schedule. They are packed with great information.
- While performing any task press 'F1'for help.
- There are multiple ways to approach tasks in The CourtRoom Program. Generally, you can work in either Batch Mode or Individual Mode. To enter payments for several defendants, it is easy to enter them in the Batch Mode. Click on Cases -> Fine/Fee Payment. Select the first defendant, enter the payment information, SAVE/EXIT. A prompt asks for the second name. Continue in this manner until all payments are processed. You can also enter Plea By Mails in the Batch Mode by selecting Cases-> Plead Guilty by Mail ->Individuals.
To work in Individual Mode, from the Case Information screen click Modify Case and select your task. This is a little slower process, but is probably what you would select if you need to do multiple things on an individual case.
Return to indexADD A CASE
Add VTL, PL and Non-Civil case
By now, most courts are probably downloading e-tickets from DMV. The following steps are for manually adding a VTL, PL or any other type of case except Civil/Small Claims or Civil Proceeding
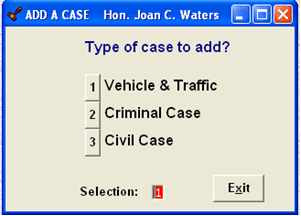
- Click Cases ->Add New Case from the top task bar
- Choose the case type by clicking on the corresponding number
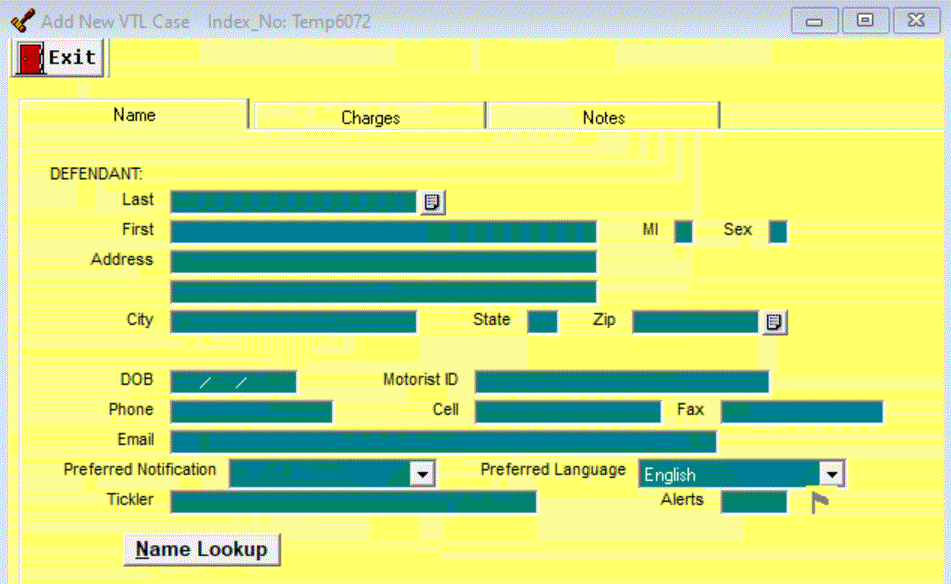
- Enter defendant information on the first screen. If the defendant has already been in your court on other charges, type in the last name and click Name Lookup. Select the correct name from the list.
- Click Charges to enter ticket and scheduling information. When the section is entered, the description fills in from the Laws database built into the program. If the charge is Speeding enter the speed in the Description field following the word Speeding e.g.: Speeding 68/55. If the charge is a Town or Village Ordinance, add T/O or V/O to the Description field. If the charge is a parkway violation, add PKWY to the Description.
- Click Add another Charge to continue adding charges for this defendant.
- Click Notes (if applicable) to enter any free form comments to save on the case
- Click Exit to save information and leave the screen
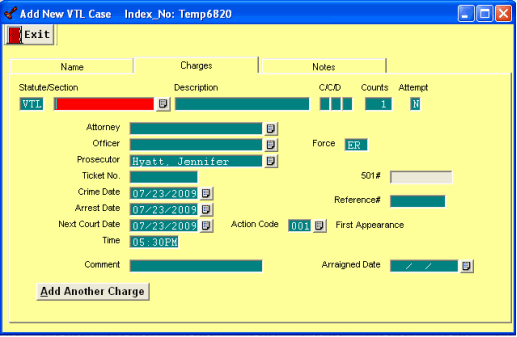
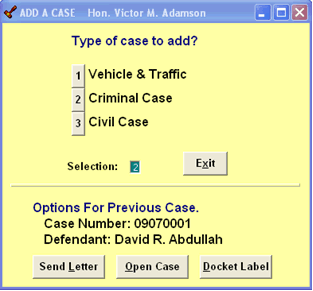
At this point, you click Send Letter to generate a letter on the new case, click Open Case to access the Case Information screen or Docket Label to print a docket label for the new case.
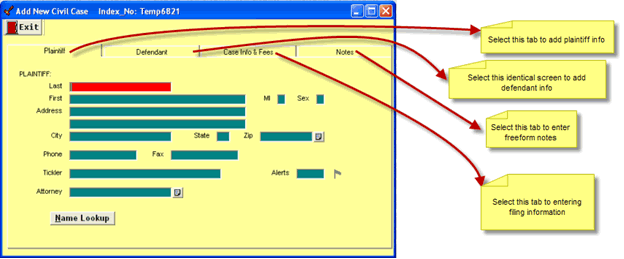
Add a Small Claims, Civil or Civil Proceeding Case
- Click on Cases->Add New Case
- Press 3 for Civil
- Enter Plaintiff information on the first screen
If the Plaintiff has already been in your court on other charges, type in the last name and click Name Lookup. Select the correct name from the list. - Click on Defendant to enter defendant information
- Click on Case Info & Fees to enter all the filing information
Remember that small claims/civil cases get reported to A/C when they are filed and the filing fees are collected. - Click on Notes to enter any free form comments to save on the case.
- Click Exit to save the new information and leave the screen
- At this point, there is the option to Send Letter to generate the Start Small Claims notice to defendant and plaintiff
Downloading e-Tickets - to use this function, you must first have access to the OCA website. Contact OCA or your judicial district representative to begin electronic downloading.
- On the task bar, Click Help->Web Site Links ->OCA Website (for CDR DMV Reports)
- When you get to the Website Login screen, follow the directions you received from OCA for downloading tickets.
- Be sure your tickets go into the DMVTRAN folder.
This folder must be created before you download tickets the first time. If you don't have a DMVTRAN folder, call the office for help. - After the tickets are downloaded, click on Utility->Read eTickets XML file to bring the tickets into the program. The program automatically assigns the docket number and assigns the tickets to the proper judge.
The first time you download tickets into the program click Main-Exit/Quit, then log back into the program. Otherwise, the options on the Utility screen are not visible.
If you have certain 'rules' for assigning tickets to judges we can help you set a custom command to do that automatically. Give us a call for further information.
CASE SEARCH - Use this option to find any case which has been entered into the program.
- Click on Cases ->Case Search
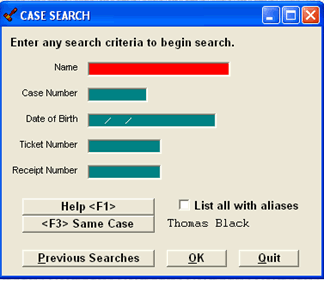
| Name: | Type the last name of the defendant |
| Type the last name of the defendant followed by a slash (/) and the first letter of the first name, i.e. Smith/R lists defendants whose last name is Smith and whose first name begins with R. | |
| Type in the Docket Number |
The following are short cuts for searching - all these are typed into the NAME field
| @ticket# | searches by specific ticket number |
| =receipt# | searches by specific receipt number |
| *DOB | searches by date of birth |
| >xxxxx | Some courts put information in the Reference Field, this searches on Reference |
| Case Number: | Enter the case or docket number |
| Date of Birth: | Enter the DOB of the defendant. This is handy when you aren't sure of the spelling of the last name, have several defendants with the same name |
| Ticket Number: | Enter the ticket number |
| Receipt Number: | Enter the receipt number given for a payment on this case |
Remember, using the barcode reader allows quick access to a specific case
When searching for a defendant who has an extension on the name such as JR, SR, III or are looking for a defendant who has an alias, click on List with all aliases for a complete list of matching names.
| Open The CourtRoom Program Help | |
| Open the last case you accessed | |
| Previous Search | Lists the last several cases you accessed - based on password, so you'll see only cases you looked at. |
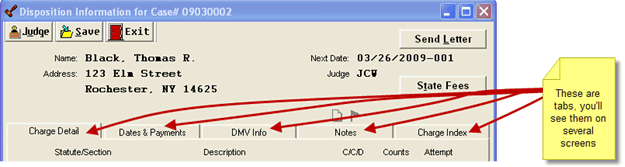
Case Information - The Case Information screen displays all the information about a particular case. Any modification to the case can be accessed through this screen. As you can see, the screen is divided into sections showing specific information in each section.
The Defendant information area displays information about the defendant. Click on Notes to open a free form screen to enter notes on the case. A defendant may have multiple address, click on Name & Address to modify an existing address or add a new address and keep a list of all addresses. Letters, payment receipts and labels can be sent directly from a case by clicking on Letters and Forms.
The Preferred Notification indicator is located above the defendant's phone number. Any indicator highlighted in GREEN is a valid Preferred Notification method. If the indicator is highlighted in RED this indicates either 1) The Preferred Notification was never set OR 2) The Preferred Notification was set but the case is missing the contact data for the selected Preferred Notification type. For a complete overview of the Notification process click here
The middle of the screen displays the charge(s). The top charge line displays the original charge. When a case has been adjudicated, the adjudicated charge information shows in the second line. The original charge always stays with the case. To see the other charges, if any, click on the arrows to scroll between charges. When a charge is adjudicated and money is due, the adjudicated fine and surcharge display to the right of the charge information. As you scroll through the charges notice the fine and surcharge display for each individual charge.
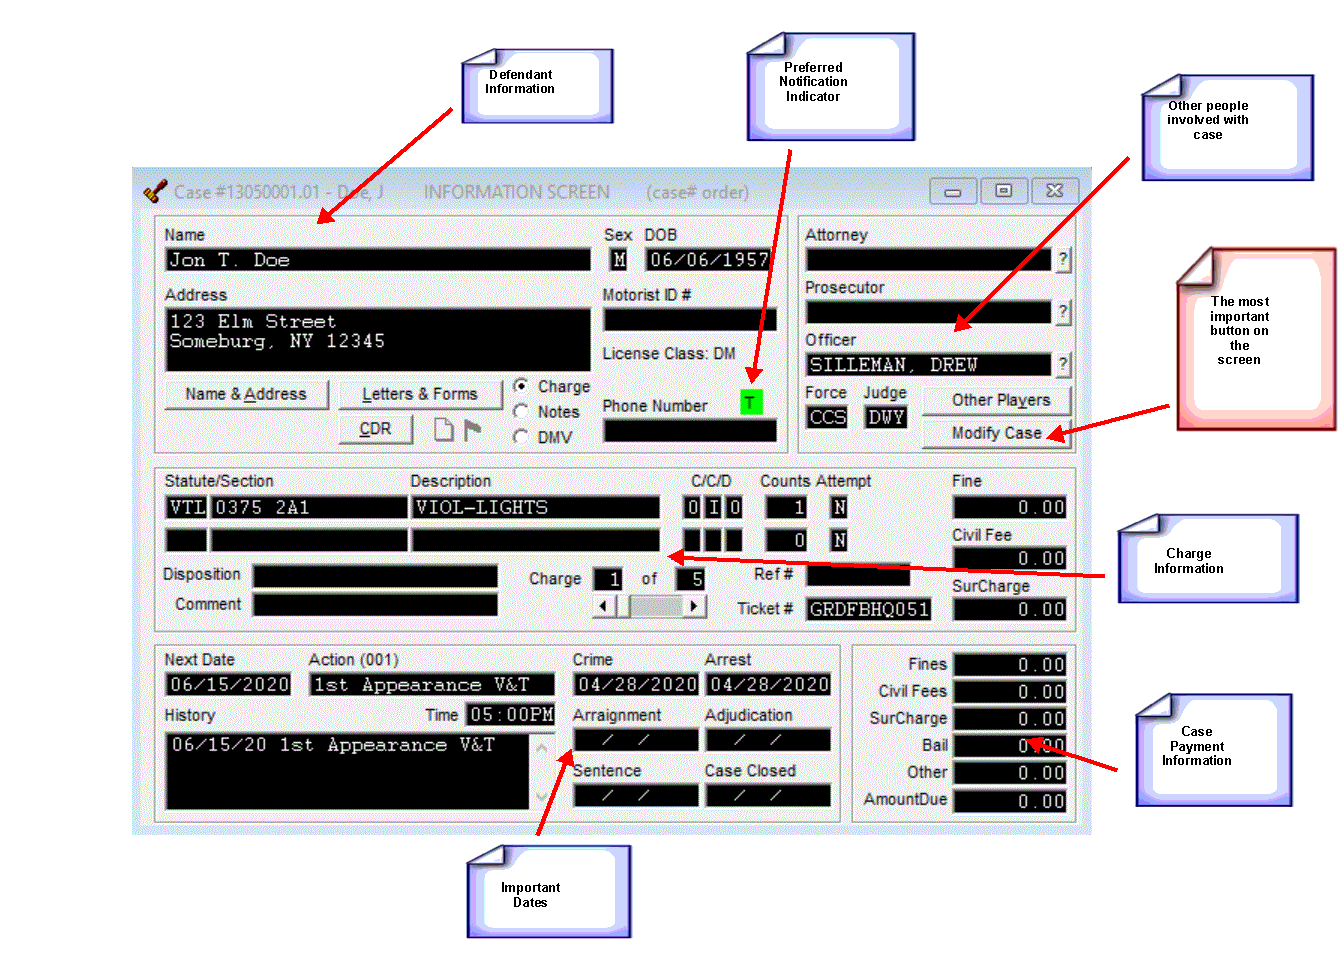
The bottom left corner of the screen displays all the case dates. When a case is adjourned, all charges on the case are adjourned to the same date.
The bottom right corner displays payment information for all charges. It reflects the total amount the defendant has paid on the case.
Just below the Name and address information are 3 buttons. Put a black dot next to Charges to display the Case Information screen with the charge information in the center (as shown above).
Click Notes to open the free form Notes screen. On the Notes screen, touch the F4 key on the top of your keyboard to automatically enter the current date.
Click the DMV button to view the DMV data for electronic reporting of Dispositions and Scofflaws.
To search for a different case from the Case Information screen, simply touch the letter 'S' on the keyboard to access the Case Search screen.
Return to indexModify Case - The Case Information screen is a 'View Only' screen, meaning there is no access to any of the information on this screen. Click Modify Case to access the screens and lists available for case modification.
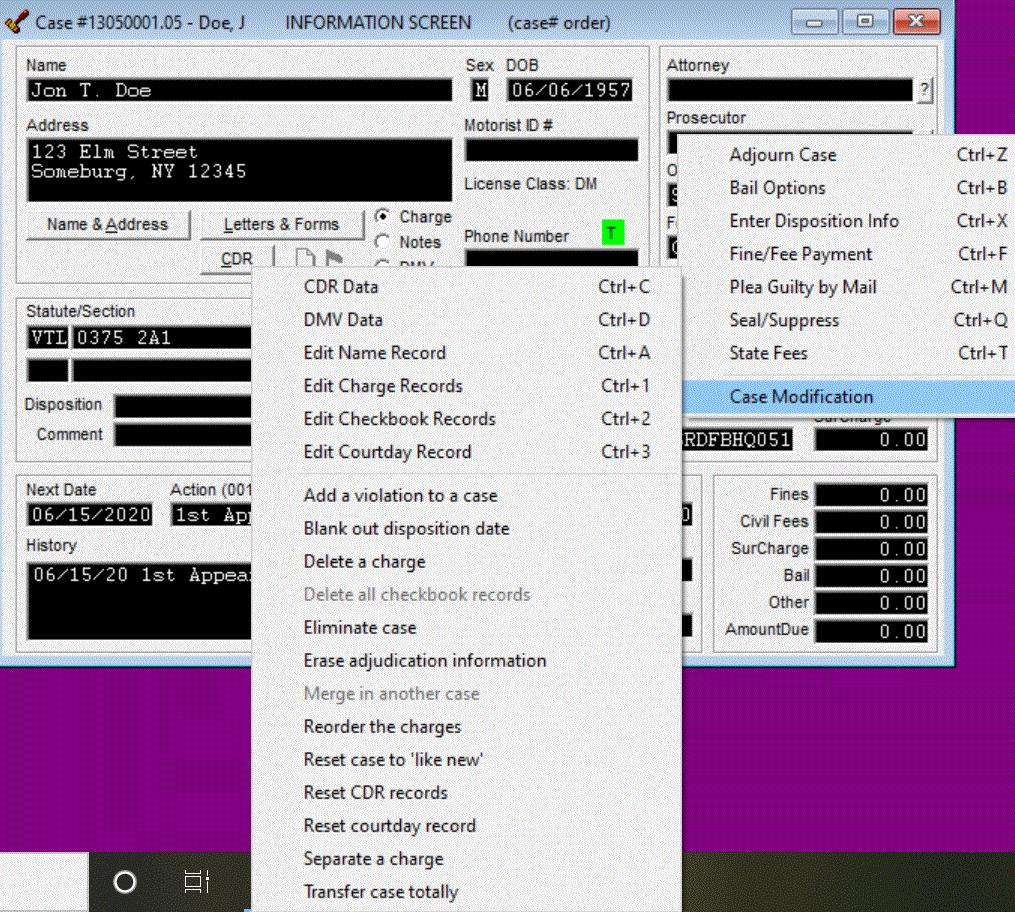
Remember, all these functions apply only to the current case
| Adjourn Case | Set defendant's next court date and time by updating the action code and new court appearance date. |
| Bail Options | Access the Bail screen |
| Enter disposition Information | Add the adjudication information for each charge |
| Fine/Fee Payment | Enter payment information |
| Plea guilty by mail | Enter the guilty plea, adjudicate and generate fine notice when defendant has pled by mail |
| Seal/Supress | Indicate the Seal Type |
| State Fees | Enter fees that are not part of the adjudication, i.e. Scoff lift fee or DNA fee |
| The Edit functions | Name record, Charge Record, Checkbook Record and Courtday Record are mainly used for making corrections on previously entered information. They are not the screens to use to enter new information. |
| Edit DMV data | Enter the information needed to electronically submit disposition or scofflaw information to DMV. |
| CDR | Access the Criminal Disposition Report (540) if one is required. |
| Reset Courtday Record | Any adjournments added to the case will be deleted and the original scheduled court day is all that displays. |
| Reset CDR records | Reset the CDR record for this case back to it's original format. |
| Erase Adjudication Information | Removes any adjudication information from the case. |
| Reset Case to 'like new' | Reset the case to look exactly as it did when first entered into the program. |
| Eliminate Case | Remove the entire case from The CourtRoom Program. |
| Blank out Disposition Date | When the disposition date is filled in there are certain things that can't be done to the case, such as separate a charge or add a violation to the case. Blank out the dispo date, make what changes need to be made and fill the dispo date back in, or leave it blank if the case is not closed. |
| Transfer Case totally | Transfer the case from one judge to another judge, within the same court. |
| Separate a charge | Occasionally, it is necessary to remove a charge or charges from one case and make a separate case. Use this function to indicate which charge(s) should be moved. |
| Add a violation to a case | Add another violation onto an existing case. Usually used when manually adding tickets and you get to the bottom of the pile and find another ticket for someone who has already been added in. |
| Merge in another case | Sometimes a defendant has more than one case with the same crime date. Use this option to merge those cases into one case. |
| Reorder the charges | Put the charges in order by severity of charges. |
Plea by Mail - Use this option to enter a defendant's plea and generate the fine notice or appearance notice.
Normally when a defendant pleas by mail, there is no reduction in the original charges. The Plea by Mail screen displays the original charge which can be replaced with the reduced charge or accepted as is. Remember, the original charge never goes away, it always displays on the Case Information Screen.

Place the cursor in the Disp Codefield to enter the disposition of the charge. For a list of codes, click on the list lookup key. Enter the Fine and Surcharge due on the charge. Repeat for all charges on the case.
Action Code updates to show the case is adjourned for payment. Enter the Date the payment is due. Click on the calendar lookup key which you see at the end of every date field to check a date.. Adjudication Date defaults to the current date. It can be changed. Comment automatically fills in with Plea by Mail. If applicable, enter the name of the Attorney and/or Prosecutor.
Click UPDATE ADDRESS to access the Name/Address screen.
Click SEND LETTER to generate the fine notice.
Click SHOW NOTES to access the free form Notes screen.
To enter DMV data for electronic reporting, click on DMV DATA.
As always, click Save, then Exit to save the information entered and exit this screen.
Return to indexFine/Fee Payment- This screen is accessed from the Case Information screen (Modify Case ->Fine/Fee Payment), from the Disposition Screen (Dates and Payments) or from the main task bar (Cases->Fine/Fee Payment)
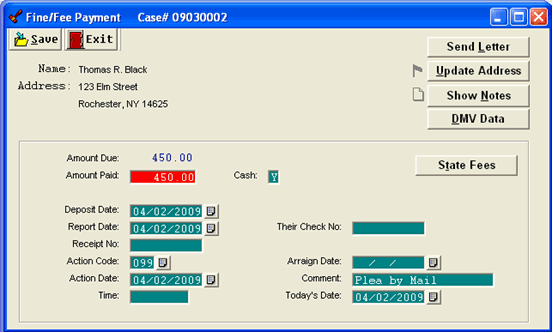
Enter the Amount Paid, or accept the default amount shown. Enter Y (cash), N (check or Money Order) or C (Credit Card) in Cash field to indicate the type of payment. The deposit slip shows subtotals of the different payment types for easier balancing.
Deposit Date shows when the money is going to the bank and Report Date shows when the transaction is going to appear on the Audit and Control Report. These dates are usually the same, but don't have to be.
Enter the receipt number you wrote, or if you computer generate receipts, type in a period (.) to fill in the Receipt No. field with the next available receipt number.
If payment was made in full and the case is closed, the Action Code updates to 099-Disposed and Action Date keeps the current date. When a partial payment is made, update Action Code with a code indicating a payment is due and put a payment due date in Action Date. Time is not necessary unless the case is being adjourned to a specific court appearance time or a specific time by which the payment should be made.
Return to indexEnter Disposition Information - Use this screen to enter adjudication information.
The Disposition Information screen can be accessed from the Case Information screen (Modify Case ->Enter Disposition Information), or from the main task bar (Cases->Enter Disposition Info).
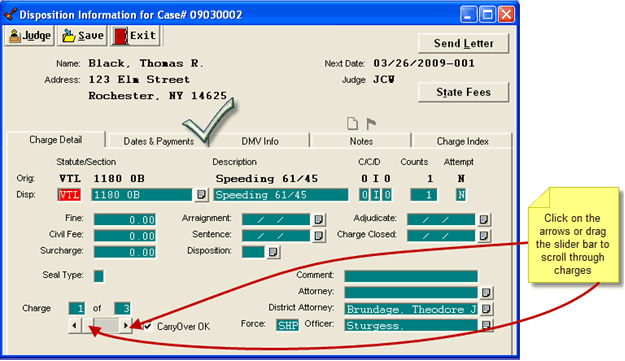
The original charge always displays. Enter the reduced charge or, if there is no change in the charge, skip to the Fine field. If applicable, enter the adjudicated Fine and/or Surcharge for THIS CHARGE ONLY. Fill in the applicable dates and disposition code.
When there are multiple charges on the case, click on the arrows or the slider bar in the bottom left hand corner to scroll through the charges. Be sure to adjudicate all charges. Click CarryOver OK to copy date information from one charge to the next.
When adjudication information has been entered for all charges, be sure to click Dates & Payments. This is where either payment information or adjournment information is entered.
As always, there are the options to Send Letter, enter State Fees go to the DMV Data screen, or add a Note. Charge Info opens a summary screen showing all charges on this case.
Return to indexSeal Charges - Access Seal Charges from the Case Information Screen (Modify Case->Seal/Supress) or the main task bar (Cases->Seal/Suppress)
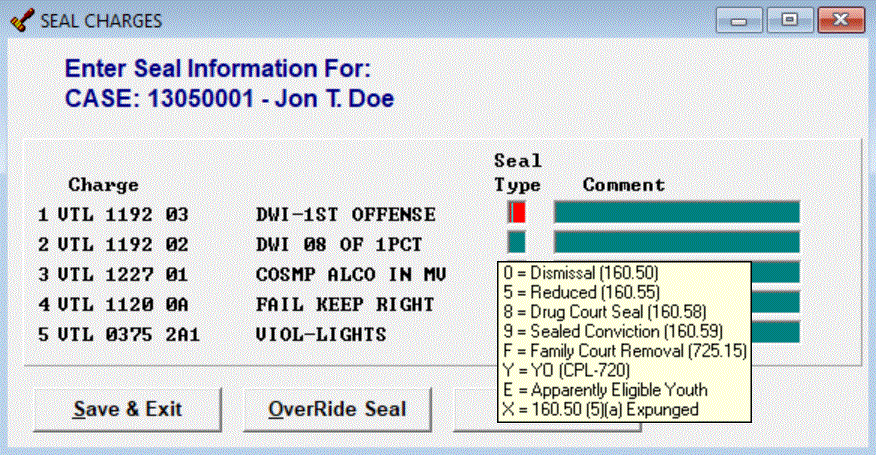
Indicate for each charge the applicable Seal Type and Comment if any. Depending on the type of seal, information is displayed on the Case Information screen or any documentation.
If, after the case has been sealed you need to see the blanked out information or print a Seal Order, click on OverRide Seal. The sealed information becomes visible for about 2 minutes so you can do what needs to be done with the case, after which the case is automatically resealed.
When adding a sealable case for a defendant less than 18 years old, the case is automatically tagged with a seal type of E, indicating the defendant is an Apparently Eligible Youthful offender.
A new prompt was added to the calendar set-up screen giving the option to print calendars showing detail on sealed YOs or EYO. Refer to the Calendar section of this manual for further information.
Return to indexBail Options - Access this menu from a Case Information screen (Modify Case->Bail Options) to manage the bail transactions for a specific case, or click on Cases->Bail Options
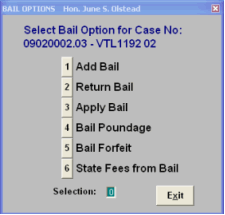
Enter in the amount of bail received in Bail. If other money was received by the court i.e. Restitution, enter in Other. Today is the date the information is entered into the computer. Bank Date is the bank deposit date. Enter the payment type in Cash (Y if Cash, N if Check and C if Credit Card). The deposit slip shows subtotals of the different payment types.
Enter the receipt number. Why defaults to ADD BAIL which can be modified. When bail is paid by check, enter the check number in Their Check no.
When someone other than the defendant makes the bail payment, click on payer. Enter the last name of the Payer and click Name Lookup at the bottom of the screen. If the payee's name is in your name list, select the name from the list. If the payee is new, click Add New Name to add in the name information.
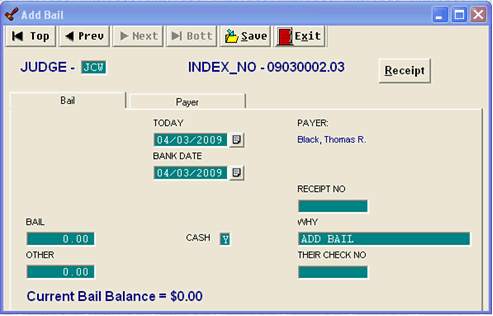
Return to indexBail Poundage - Bail Poundage is a fee collected by the state. The amount of poundage collected is either 2% or 3% of the bail, depending on the county. The program adjusts the percentage automatically. Please refer to your Handbook for Town and Villages Justices and Court Clerks (HELP->Justice Court Fund Handbook) for information on bail poundage.
Upon accessing the Bail Poundage screen, notice The CourtRoom Program has already calculated the bail poundage depending on your county. In order for the bail poundage amount to be calculated correctly, do the bail poundage steps before returning or applying bail.
Enter the correct dates and receipt number, if applicable.
When the judge has a separate bail account enter the check number from the bail checking account in Check No. The receipt number from the Regular account can also be entered.
When the bail and fine/surcharge monies are in the same bank account, this amount does not show on the Deposit Slip since the money was already deposited when the bail was received. It shows on the Cashbook report as a re-allocation of funds from the bail column to the Civil Fees column.
When the bail is initially deposited in a separate bail account, a check must be written from the bail account and deposited in the Fine/SC account (or Regular Account). This payment is shown as a deposit on the Deposit slip and Cashbook report as it is new money into the Regular Account.
After deducting Bail Poundage, look at the checkbook on the Case Information screen. A red dollar sign ($) displays next to Civil Fees indicating there was or is money in that field. Touch the letter "C" on your keyboard to see the checkbook entry.
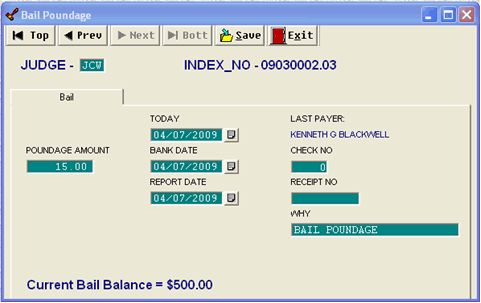
Return to indexApply Bail - Use the bail money to pay some or all of the fine and surcharge. Whoever paid the bail must give permission to do this.
The total amount due on the case displays in Amount to Apply, accept or modify the amount. Verify the dates. If the judge has a separate bail bank account, enter the check number used to write a check from the bail account to the fine/fee account. If a receipt was written, enter the number.
The payment gets deducted from bail and applied to the Fine and Surcharge.
When the bail and fine/surcharge monies are in the same bank account, this amount does not show on the Deposit Slip since the money was already deposited when the bail was received. It shows on the Cashbook report as a re-allocation of funds from the bail column to the Fine and surcharge columns.
When the bail is initially deposited in a separate bail account, a check must be written from the bail account and deposited in the Fine/SC account (or Regular Account). This payment is shown as a deposit on the Deposit slip and Cashbook report as it is new money into the Regular Account.
If all the bail was returned or applied to Fine/Surcharge payments, the defendant's checkbook record on the Case Information screen should show a red dollar sign ($) next to the word Bail and the bail amount should be zero. Touch "C" on your keyboard to see all the checkbook transactions.
Bail money can also be applied to State Fees by clicking State Fees from Bail on the Bail Options Menu.
Return to indexReturn Bail - Use this screen to return the bail to the person who posted bail.
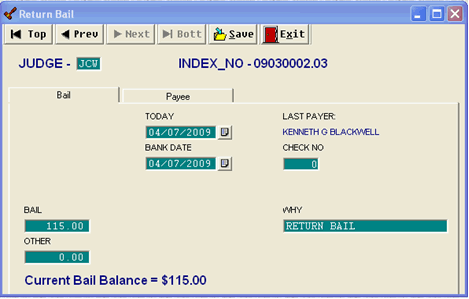
The amount showing in Bail is the total amount left after the bail poundage and/or fine and surcharge have been deducted. If nothing was paid out of bail, the total bail collected displays. Indicate the date the bail return check was written and the check number. Verify that the correct name displays as the LAST PAYER. This should be the person who posted the bail. If for some reason a different name shows, click on Payee and select the correct name.
After the bail balance has been returned, the defendant's checkbook record on the Case Information screen should show a red dollar sign($) next to the word Bail and the bail amount should be zero. Touch "C" on your keyboard to see all the checkbook transactions.
Return to indexPlease refer to your Handbook for Town and Villages Justices and Court Clerks (HELP->Justice Court Fund Handbook) for information on when bail can be forfeited.
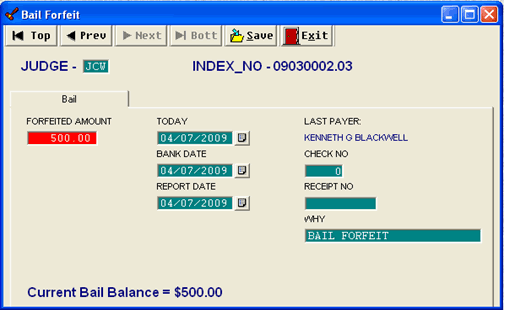
Indicate the amount of bail to be forfeited and the applicable dates.
When the bail and fine/surcharge monies are in the same bank account, this amount does not show on the Deposit Slip since the money was already deposited when the bail was received. It shows on the Cashbook report as a re-allocation of funds from the bail column to the Fine and surcharge columns.
When the bail is initially deposited in a separate bail account, a check must be written from the bail account and deposited in the Fine/SC account (or Regular Account). This payment is shown as a deposit on the Deposit slip and Cashbook report since it is new money into the Regular account.
If the judge has a separate bail account, enter the check number from the bail account in Check No. Enter the receipt number from the Regular Account in Receipt No, if applicable.
After entering the Bail Forfeit, look at the checkbook on the Case Information screen. A red dollar sign ($) displays next to Fines indicating there was or is money in that field. Touch the letter "C" on your keyboard to see the checkbook entry.
Return to indexMISCELLANEOUS MONEY TRANSACTIONS
Fees are collected for producing miscellaneous forms such as Transcripts of Judgment or Certificates of Disposition. Click on Cases->Misc Money Transactions. Select the type of form, enter the fee and applicable dates. Click on the Lookup box next to the Paid By field and select the name of the person who paid the fee, this could be a defendant or an attorney. If the name is not in the list, add it in by selecting Add New Name.
Each payment shows on the Deposit Slip and Cashbook Report as entered. The Audit and Control Report (AC1030) lumps together all the Misc Money Transactions for the month and reports one grand total as one of the first entries on the AC report as show below.

When a Town or Village Parking ticket which was not written on a TSLED ticket is paid and you do not have our Parking Program, enter the payments by clicking on Cases->Parking Payments. Enter the fine and surcharge, if applicable and dates.
There are two ways to use this Parking Payment option. As individual payments are received, enter the payment, all the applicable dates and name of payee. When payments are entered this way each payment shows on the deposit slip and cashbook report.
Payments can also be entered in batch throughout the month, or just once at the end of the month. Enter the total amount of all the parking payments in the batch as one lump sum. In the Paid by field, type in PARKING and click on the lookup key. Select the Parking Record from the names list. In the Why field enter the number of tickets included in the batch or just leave it as Parking. The Deposit Slip and Cashbook Reports show the lump sum deposit(s) for the month.
No matter how the payments are entered, the Audit and Control Report (AC1030) lumps together all the Parking Payments for the month and reports one grand total as one of the first entries on the AC report as show below.

REPORTS - There are several basic reports available when The CourtRoom Program is initially installed. In addition, there are dozens of reports available to add into the program. If a report is not listed, give our office a call and we will try to help find the report you need.>

View Print Report -
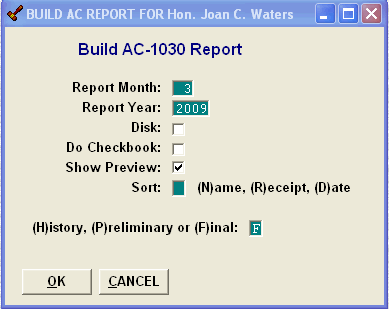
Enter the Report Month and Report Year. We suggest printing the report for review by putting a checkmark in Show Preview and clicking OK.
To show an entry on the cashbook report indicating the reportable money being deducted from the court checkbook, put a checkmark in Do Checkbook.
The Audit and Control Report can be sorted by Name, receipt number or Disposition Date. The default is Disposition Date.
There are 3 versions of the Audit and Control Report.
The History Report prints a case history for each case on the report.
The Preliminary Report prints the report in a simple list. This is a great way to balance the report as it can easily be checked against tickets or the receipt book.
Select the History Report or Preliminary Report, a date range prompt displays giving the option to print the report for a specific period of time.
The Final Report is the JCF approved format.
When the monthly report is in balance and ready to be submitted, indicate the month and year of the report and put a checkmark in the Disk field. A message displays at the bottom of the box indicating where the electronic file is to be stored - normally either a folder on the hard drive, a flash drive or floppy disk. Normally, this is defined at the time of program installation. Call for help setting up the destination drive.
After the electronic file is created, click on Help>Website Links>OSC/JCF Website (for Monthly Audit Reports). A connection is made to the JCF website. For assistance with transmitting the AC report from the website, contact Justice Court Fund.
The following steps should be done before creating the Audit and Control Report.
Add Copies Made - Use this option to indicate the number of copies the court furnished during the month. Refer to the Handbook for Town and Village Justices and Court Clerks for guidelines on how to determine the number of copies to be reported
Add Adjustment Entry - Use this option to report any adjustments being reported. Refer to the Handbook for Town and Village Justices and Court Clerks for guidelines on reporting adjustments.
Compare Report to Cashbook - Use this option to look for checkbook records where the Bank Date is equal to the report month but the Report Date is set to a different month.
If any cases with date discrepancies are found, a message displays stating a version of: 'X Error(s) Found. Charge XXXXXXXX.XX Bank XX/XX/XX Report XX/XX/XX Fine/Fee Payment'. The message can be printed. Then, do a case Search to find the case, look at the checkbook records and edit the bank or report date.
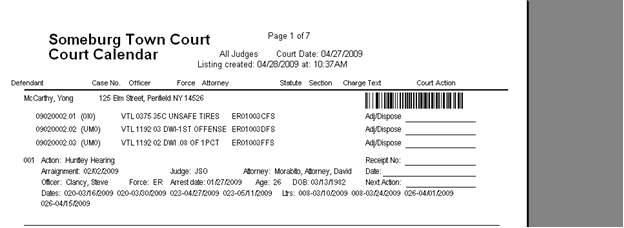
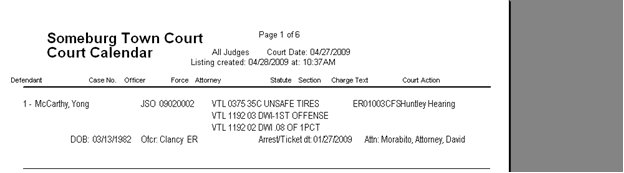
Return to indexCALENDARS - A calendar is a listing of defendants scheduled to appear in court on a given day. It is important to be consistent with assigning the correct Action Code and adjournment date/time in order for the calendars to work properly.
When The CourtRoom Program is installed 3 styles of calendars are included. The Multi Line Calendar shows the most information. Clerks and judges often have this calendar on the bench during court to take notes on the case.
The One-Line Calendar has the least amount of information.
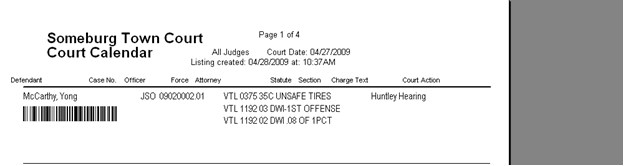
The Two-Line Calendar is a happy medium between the Multi line and the One line.
Select Calendars from the Report Menu. In addition to the 3 basic styles there are dozens more on our website to download into the system. If another court uses a calendar style you want, give us a call and we'll help find it.
To create a Court Calendar, click on Reports->Calendars and pick the style you want to use. Then tell the program which cases to include on the calendar.
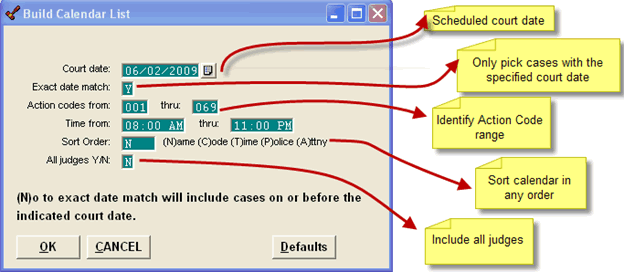
Click OK to build and view/print the calendar.
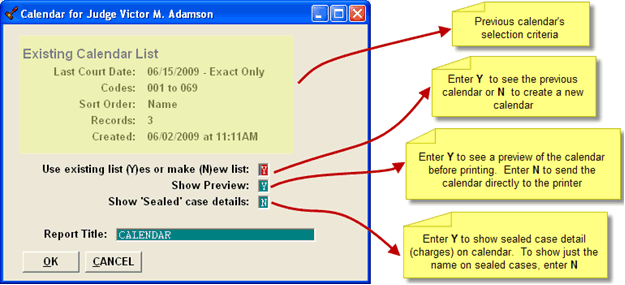
Once the calendar is created, the calendar setup screen remembers the information until you tell it to make a new calendar and enter new criteria to build a calendar.
In addition to creating calendars for court appearances, use the Action Codes to create calendars listing scofflawed defendants or defendants who are 'adjourned' on a Bench Warrant or Arrest Warrant. Give our office a call for help creating special calendars.
When viewing a calendar, place the cursor of the defendant's name and click to open the case information screen. Place the cursor on a charge and click to open the Enter Disposition screen. Place the cursor on the action code or date and click to open the adjournment screen.
Other Calendar Options
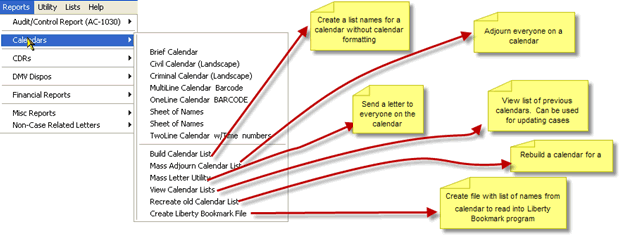
Please give our office a call for help with any of these options.
Return to indexFINANCIAL REPORTS - Several basic reports are loaded when the program is installed. There are many more reports on the website which can be downloaded into the program. Following are descriptions of some basic financial reports.
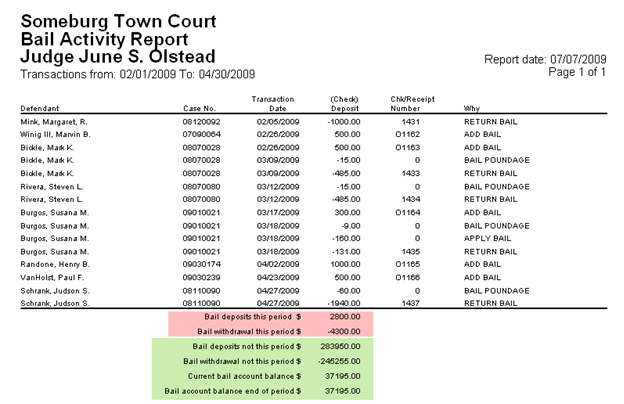
BAIL ACTIVITY REPORT - The Bail Activity Report lists all bail transactions within a defined date range for the currently selected judge.
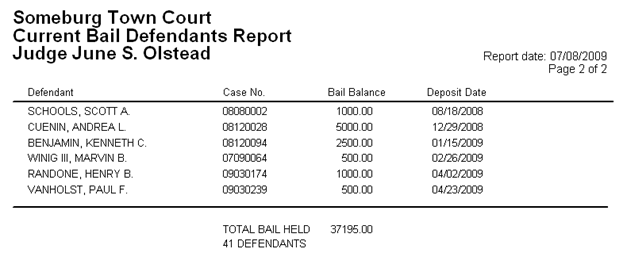
CURRENT BAIL REPORT - This report lists all defendants who currently have a bail balance. It can be run for one judge or both judges.
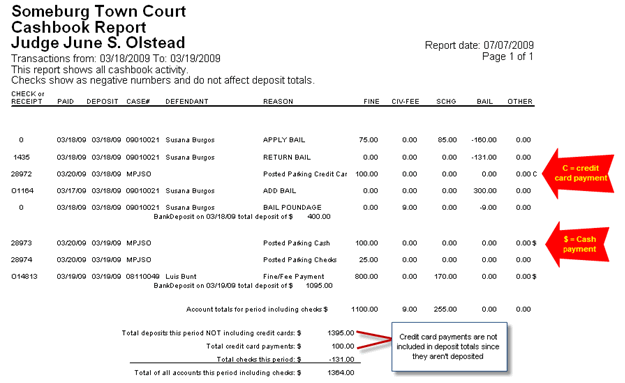
The Cashbook Report lists financial transactions within a specified range, either date or receipt number. When the report is run by receipt number range, only transactions having a receipt number are included. > Transfers or applied transactions do not show, unless a receipt was written. Also, checks written by the court do not show.
A Cashbook Report run by date shows money received and money disbursed by the court within the specified date range. The transactions are separated by deposit or check date and show totals for that date. At the end of the report the totals for the entire range are shown.
DEPOSIT SLIP - After entering all payments and preparing to go to the bank it is advisable to run a Deposit Slip to verify that the money entered into the computer balances with the money being taken to the bank. When the money is balanced on a weekly (or daily) basis the month end balancing is much easier.
Deposit slips can be run by deposit date range or receipt number range.
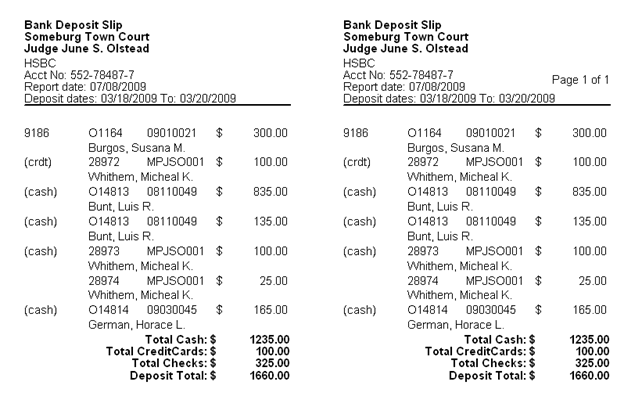
Notice the printout is in 2 parts. Cut the report in half. Include one half with the actual bank deposit slip and keep the other half with your records.
As with most of the reports, there are several variations of the Deposit Slip. We can help you find the style that best fits your needs.
In addition to these basic financial reports, there are others we can help you add to your list.
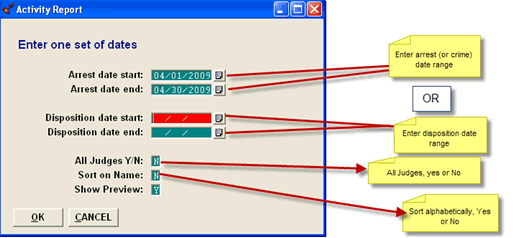
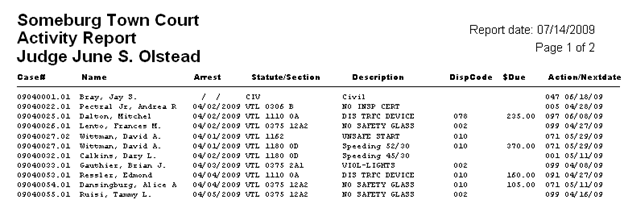
Return to indexThe Activity Report lists the activity for any cases within specified arrest or disposition dates. It can be run for all judges or just the currently active judge. It can be sorted by defendant's last name or by case number.
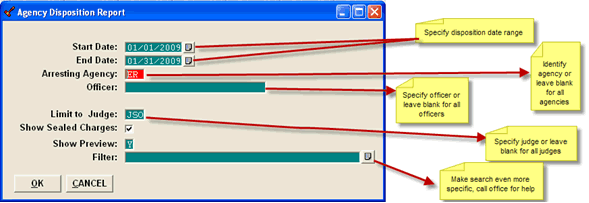
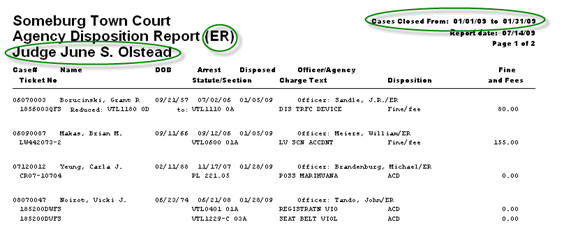
The Agency Disposition Report lists all closed cases meeting the criteria you enter regarding disposition date, agency and officer.
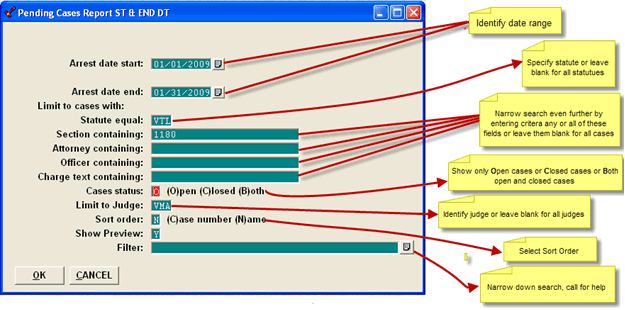
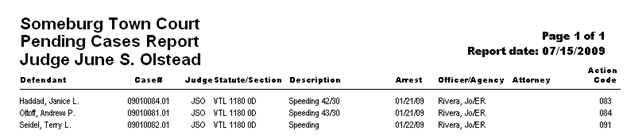
Pending Cases Report
The Pending Cases Report lists cases based on the specific search criteria entered. It can be very broad in scope or can be narrowed down by entering specific information in the various fields and even creating a filter to be even more concise.
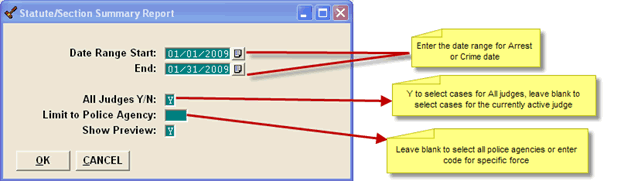
The Statute/Section Summary Report looks at all cases with an arrest (or crime) date in the specified date range and gives a total count for each statute and section entered.

The Summary Report by Case Number is one of the most frequently requested reports. This report gives the counts required on the JCAP Grant Application.
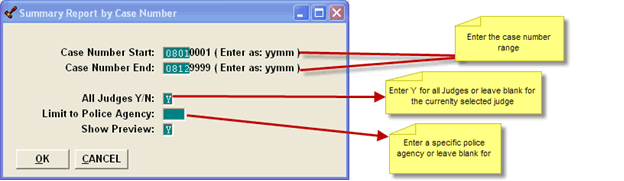
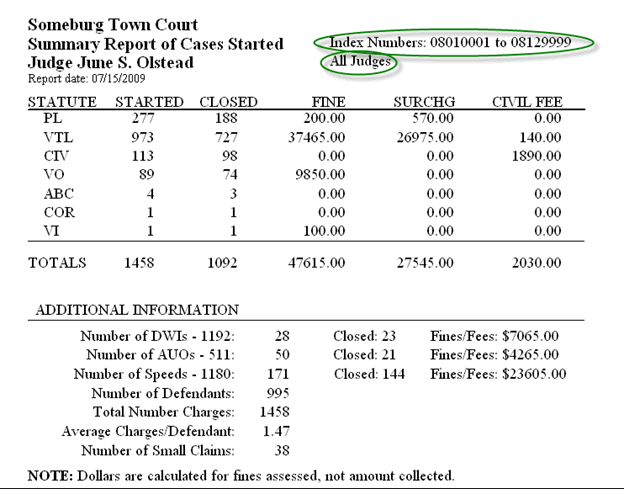
Remember the breakdown of the case or docket number - the first two digits, in this example 08 represent the year the case was entered into the program. The second two digits, 01, represent the month and the last four digits 0001 represent the sequential number of the case. So, for this report we are looking for all cases entered beginning with the first case entered in January of 2008 through the last case entered in December of 2008.
There are several variations of The Summary Report. Give our office a call for help determining which report will give you the information you need.
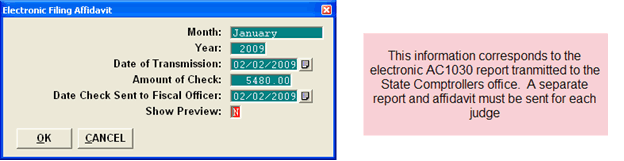
Return to indexNON CASE RELATED LETTERS - Most letters in The CourtRoom Program are generated for a specific case, however, it is possible to create a letter which is not case related. The most commonly used non case related letter is the fax generated to the State Comptrollers Office notifying them that the electronic AC1030 (month-end) Report has been submitted.

UTILITY - The Utility option of the task bar is thought of as the housekeeping section of the program. The Desktop Calendar and Desktop Calculator are just that, a calendar and calculator you can access while in the CourtRoom Program.
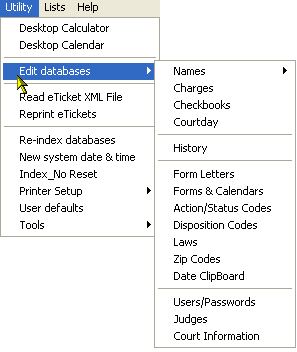
Return to indexEdit Databases - Accesses the data files where all the information in the program is stored.
Probably, the most used option is Form Letters. The CourtRoom Program has the ability to add new letters either by importing letters from our website or creating new letters on your own. Download the Letters Manual from our website by clicking on Help> Web-Site Links,>Service Education Website. Click on Help Options and select Letters Manual.
Return to indexAdding New Codes - When the CourtRoom Program is installed, basic lists of Action, Disposition Codes, Laws and Zip codes are included. These lists can be added to by choosing the appropriate list from Edit Database. Once the Edit screen is accessed, click on New.
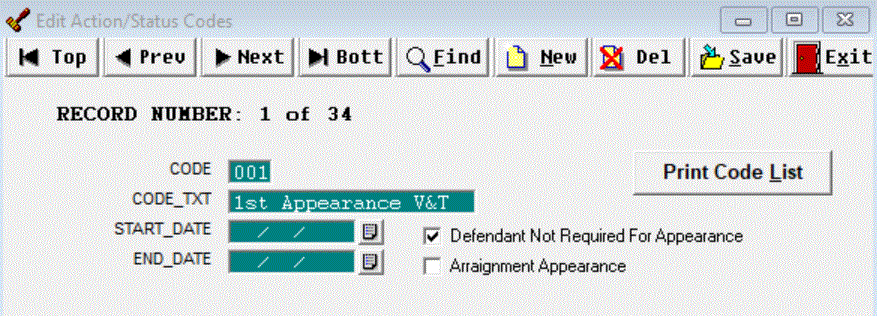
Respond YES to add a new code and fill in the blanks with the new code information. Be sure to also indicate if the Defendant Not Required For Appearance or if the action is an Arraingment Appearance. When finnished click on Save and Exit.
The process is the same for adding new Disposition Codes, Laws and Zip codes. It is best to call our office for help modifying the Users/Passwords, Judges or Court Information screens. Date Clipboard - is a handy tool for entering repetitive dates. For example, after court when updating cases which are being adjourned for the same court day or entering payments having the same deposit date use the Date Clipboard to set speed keys for individual dates. Open the Date Clipboard by clicking on Utility->Edit Databases,>Date Clipboard. Enter a title for the date and the corresponding date. Notice the little black dot in Home key = Today's date. A black dot in any one of those circles programs the corresponding key to fill in the date set when the HOME key is pressed. If the black dot is next to Home key = Today's date, the current date is inserted when the Home key is pressed. The Date Clipboard is set for each password. Every user can set the clipboard with his or her preferred dates.. Once the dates are defined, click OK to save and close the clipboard. The clipboard can be reopened and moved to a corner of the screen or minimized for quick reference. As you work through updating cases, press the corresponding key to enter the appropriate date. It's best to call for assistance with the rest of the Utility screen options. HELP - offers many non case related functions. Please give our office a call for help or further explanations of these options. 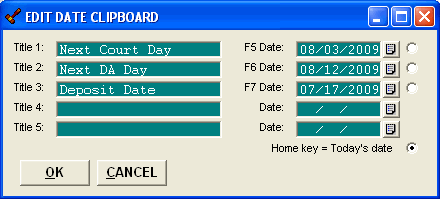
Return to index
Help
Provides Help on CourtRoom Program functions.
Getting Started
Gives a list of steps to follow to learn how to use the fundamentals of the CourtRoom Program.
Enable Remote Support
Provides Service Education the ability to access your computer remotely for immediate problem resolution and support.
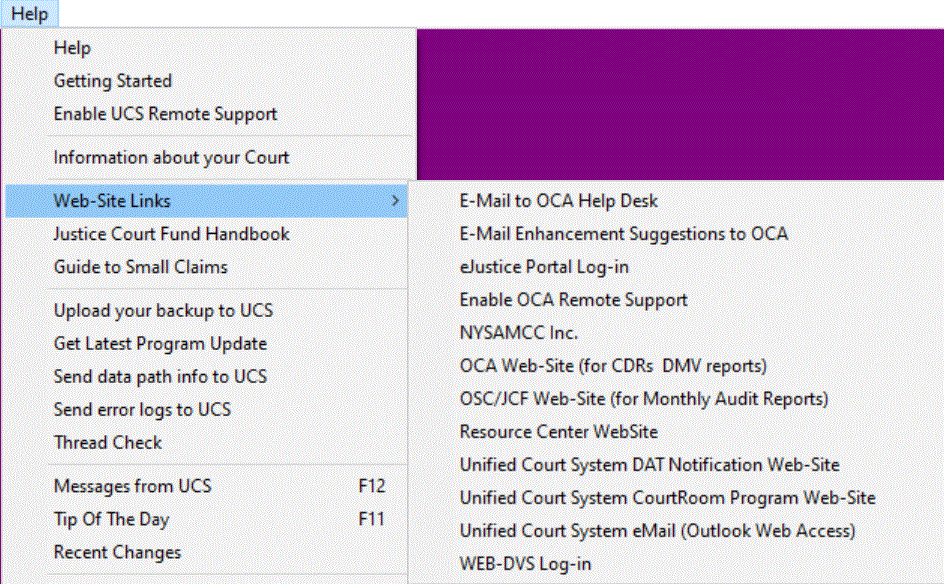
Web-Site Links
Click on any of these options for quick access to emails and website most frequently accessed by the courts.
Justice Court Fund Handbook
A PDF version of the Handbook for Town and Village Justices and Court Clerks
Guide to Small Claims
A PDF version of the handbook given to the parties of a Small Claims or Civil case.
Upload your Backup to SEi
We ask courts to periodically send us a copy of the backup of The CourtRoom Program. Be sure to continue doing local backups on a floppy disk, CD or flash drive.
Get Latest Program Update
We suggest you get an update to the CourtRoom Program at least once a month.
Send error logs to SEi
Occasionally a court may have problems with The CourtRoom Program so we may ask for an error log documenting the problems.
Messages from SEi
A tool we use to get information out to the Courts.
Tip of the day
Displays the CourtRoom Program Tip of the Day.
Recent Changes
After updating The CourtRoom Program look at Recent Changes to see an explanation of the changes and new features.
About the CourtRoom Program
Displays information about The CourtRoom Program